I'm baaack! You may now re-tape the black paper to your screens.
Candy: the pinnacle of sugar highs and finger foods. Sadly, most of these ethereal edibles have been degraded to mass-produced, sugar substitute packed, neon bricks. But the hardest hit are the basics: those little things that those big producers think you're too stupid to make yourself. Join the battle- we have cool hats.
This recipe for hard caramel doodads is a good starting place for the beginning sugarworker. It makes hard, strong flavored caramel candy that is much better on ice cream than by itself. The best part? There is no set recipe, so you can make as much or as little as you want. And here, my friends, is the magic formula:
2 parts (I used cups) granulated sugar
1 part water
and
1 tablespoon corn syrup
Whatever you do, don't skip out on the corn syrup. It's a powerful anti-crystalizing agent, and will keep you from getting a grainy desert.
Now, here are the instructions. Learn them. Live them. Love them. First, mix all your ingredients into a delicious goopy mush. Put over high heat, and boil without moving or stirring the pan until the bubbles are slow and stacked. For those who don't trust their eyes, a candy thermometer will read 340 degrees Fahrenheit, and the sugar will be at the hard crack stage when it's ready. Here, you have two choices. You could just mix it in this state with some peanuts, pour onto a well-lubed baking pan, and make peanut brittle. Or, you could take it to the next level.
Pull the sugar syrup off the heat, and use a clean metal spoon to slowly stir until the syrup falls in a continuous stream. At this point, you should have two inverted baking sheets topped with that parchment paper I know that you have. It costs like three dollars, people. Holding the spoon above the paper, drizzle the sugar into little lacy patterns. When they cool, you can simply lift them off of the paper. If you really need to impress someone, place it on top of a scoop of ice cream on a nice plate.
But the fun doesn't end there! You know those chocolate molds in the back of your cupboards that you never use? Even though you think that you don't have any, check. I'd bet my left arm that you do. Butter those, and you can pour the slightly cooled syrup in. They will retain the exact details of the mold, and make some nice pretty candy.
So, go forth and find me a battle hat!
Friday, April 16, 2010
Saturday, March 27, 2010
Waffle Time!
Waffle time, it's waffle time, will you have some waffles of mine? Waffles are great. Really. Their uniqe shape means that the waffle has more outside than inside! And here's the waffle's real claim to fame (at least to us nerds) One day, a US man figured out that the trick to making great shoes could lie in the interesting physyology of the waffle, and poured liquid rubber into his wife's waffle iron. He named the shoes after the goddess of victory- Nike. There you have it- ridiculously overpriced shoes would never exist without our humble fluffy friend.But seriously, this common baked good has fallen from grace. It's been relegated to frozen floppy things flavored with yummy catalyzed polymeriztion! Know where I just saw that word? The side of a paint can. Here is a shiny new recipe for fluffy, yummy waffles with no polymers.
1 3/4 cup flour- 2 teaspoons baking p owder
- 1/2 teaspoon salt
- 1 tablespoon sugar
- 3 eggs
- 7 tablespoons vegetable oil
- 1 1/2 cups milk
Mix all the dry ingredients in a large bowl. Like, the second largest you have. (I say second largest because I know people whose largest bowl could be mistaken for a satellite dish. But hey, who needs all those channels when we youtube have cat videos?)
Separate the eggs, and use your electric mixer to beat the whites to stiff peaks. Like weebles, stiff peaks wobble, but they don't fall down. In a smaller bowl (not small, but smaller.), beat the yolks, and then beat in the oil and milk. Then, mix that into the dry ingredients (whisking, please!).
Now we come to the waffle dilemma: mixing the light, airy eggs into the dense, heavy batter. How to solve it? Well, you might want to call on your fourth grade teacher. Why? Fractions, my friends. Divide the eggs into thirds. Stir in the first third as quickly as possible- this step is not about folding, you just want to lighten the batter for the eggs to come. Then add the second third (second third? wow. i need better words.) and fold it in. Repeat with the last of the eggs.
At this point, your waffle iron should be heated up. You did heat the waffle iron, right? Good job. Use a spring-loaded ice cream scooper to put two scoops of batter into the iron, close, and wait. When it's done, remove with a fork and enjoy. :)
Tuesday, March 23, 2010
Do you know the muffin man?
MCAS.
M Massachusetts
C hild
A buse
S ystem.
(actually, it's Massachusetts comprehensive assessment system)
I have this lovely torture on Wednesday, and, like every other person who's taken it, I was dragged to several meetings in an attempt to get us students "exited' and "ready to learn." Along with the other usual rants, the things that comes up over and over again is "eat a good breakfast." A "good breakfast" is muffins! Not mini-muffins, big, huge, fluffy things coated in butter or cream cheese. You can make them the night before and warm up in the morning so that you have something to munch on. Here is my new favorite recipe for basic muffins:
2 cups flour
3 teaspoons baking powder
1/2 teaspoon salt
3/4 cup sugar (don't worry, I need those calories)
1 egg
1 cup milk
1/4 cup vegtable oil
1. Preheat oven to 400 degrees.
2. Stir together all the dry ingredients in a big bowl. Why? Because now you need to make a well in the center. Don't just sick your spoon in and think it's okay, because it's not. (I learned the hard way- I made this twice in 20 minutes.) Push the dry stuff all the way up those bowl walls, and leave to do something else.
3. Something else: Lightly beat the egg, and mix in the milk and oil. Pour those down the well in the dry stuff, and mix. It is imperative that you impeccably use the implement to integrate the ingredients instantly. (try saying that one time slow!) Overmixing is the key to a bad muffin! But don't undermix, or your muffins will have dry flour pockets in them. Gross.
4. And now we come to the fork in the road. Pick it up! It might pop some tires. It really dosen't matter wether or not you use muffin cups. As long as you grease the pan well, you'll be fine. But, If you must have the classics, they have ones with bunnies on them!
5. Fill the cups all the way (yes, all the way. you won't get quite as many as you normally would, but they'll be nice and big.)Put in your hotbox for 25 minutes, or until a toothpic placed in the center comes ou- let's stop here. I have always had a problem with the toothpick theory. It essentially asks you to stick your head into a 400 degree metal box while forcing a small stick into a place that won't leave gaping holes in your baked good without touching anything in the oven. It just doesn't work! Try this: use a skewer. The bamboo kind you use for barbecue! They're long, thin, and require much less entry into the oven. And it works!
This is a recipe for plain muffins, and for some, plain just doesn't cut it. Thankfully, this recipe is also adaptable for any number of add-ons. Try bacon and cheese! (I like orange cranberry muffins the best) Now you can go forth and be tested and tortured with a full stomach. :)
Monday, March 22, 2010
Absolutely not a witty title related to applesauce
Who doesn't love apple sauce? A better question- who loves searching those little plastic cups in the grocery store for the one super-organic package of zero-sugar noxious hippie chow that your children will not trade to a classmate for a half-eaten melty candy bar? Nobody. You can make apple sauce, but then you'd need to get out the big pot and simmer for 2 hours and mash it up with a potato masher, right? Not necessarily. Here are my very vague instructions:
The ricer method:
Peel, core, and rinse as many apples as you think you will need. Cut them in half or even quarters for large apples, and leave small ones whole. Bake or microwave until soft and warm, and send 'em through your friendly neighborhood ricer. No ricer? No problem.
The microwave method:
Peel and rinse the apples, then cut in half using a heavy chef's knife. This method does not work for the ricer because you need the round shape for maximum squishing, but here is my magical trick for washing less fruit and get the seeds out at the same time: use a metal teaspoon to scoop the area around the seeds out. This leaves you with a lovely little circle that you can use for, well, nothing really. Throw it away. Roughly chop, microwave in a microwave safe bowl, and cook on high for 3-5 minutes or until soft. Sorry, but this time, you do need the masher. Mash away at the apples, finish with cinnamon, and be done.
With both methods, you get minimal effort applesauce that's actually good for you! You can eat it for breakfast, or top with a generous helping of ice cream. Also for breakfast. And now, I patiently await the end of the Monday curse. :)
Wednesday, March 17, 2010
Poach'd! (ouch! my e!)
I'm better!!
Evil, thy name is egg. Poached egg, to be precise. As of today, I have, in my life, made these 3 times. You'd think that dropping an egg into water and letting it sit for a few minutes would be easy, but it's not.
What you expect: Nice little jiggly blobs with a yummy, runny yolk sliding onto a clean, shiny plate, and sitting down to consume with some nice toast.
What happens: You follow the instructions as well as you can, but the white gets stringy, the yolk separates entirely, and the spoon breaks the yolk in the water before trying to fish out any possibly edible remains. Then you scrape the egg bits off the bottom of the pan, and plop down in the middle of the 7:00 p.m. chaos that usually turns up in a house with 6 people. It's underdone.
If you can't think today, (or are especially lazy) my endeavor was an epic fail. In order to spare others from the same horrible fate, here are my egg poaching tips:
- Use fresh eggs. As an egg ages, it begins to separate and weaken, inevitably resulting in a less-than-desirable egg.
- Find a reliable recipe, and follow the instructions as closely as possible, especially if you have never done this before. I know what you're thinking- a recipe for eggs? Yup, there are rules. FOLLOW THEM.
- Use a slotted spoon. Why? Your lovely chicken balls have been submerged in water for a few minutes. When things get in water, they tend to become wet. Even if the eggs weren't wet, they are hot, so vapor will condense on the plate. By using a slotted spoon, the egg will get all the support it needs while giving water an exit point.
- Serve on toast. Coming back to the previous point, a nice piece of toast will soak up the egg water. Don't worry, it will still be, strictly speaking, edible. :)
- Saved the best for last: Cheat! You can go out and buy some fancy poaching cups that will clunk around your cupboards for several years and then end up re-gifting. You can wrap it in plastic wrap. This method is quite strange, and unless you are absolutely confident in your pan, then I do not recommend it. You can go back to our old friends, the cleaned out tuna cans. They cost about three dollars, and you can just wipe 'em out after consuming said tuna. Just place in the simmering water, and put each egg in its own little circle. The resulting eggs will not have the same rustic, blob-like shape, but you can pretty much be sure of success.
Monday, March 15, 2010
Sick Day Food
Sick day.... Fun. What makes it worse is that I was sick with a stomachache, so I can't pig out on ice cream and chips like every other person in the world because I don't want it to be worse. Here is a list of all the things I ate, in no particular order, so that you can laugh at my sadness:
**I'll cook something when I feel better :)**
- bagel
- yogurt
- grapefruit
- dried cranberries
- fruit2day
- fruit snacks shaped like bunnies
- organic pop tart
**I'll cook something when I feel better :)**
Thursday, March 11, 2010
You say potato, I say pancake
Potato pancakes- a Hanukkah staple. If you haven't tried one of these delightful devices, you have been sadly deprived. I'll attempt to describe them: Shredded potato and onion fried with egg and flour into a warm, crispy, fluffy circle or rectangle. They are a bit of work to make, but with a few decent tools and sound food science in your soul, you don't need to wait for winter to have potato pancakes. You need:
4 russet potatoes
1 small onion
1 large egg, beaten
2 1/2 tablespoons flour
1 teaspoon salt
2 cups of oil (canola, peanut, vegetable, whatever for frying)
Assemble your vegetation and cut into spreadable pieces. Peeling the potato is optional; most people don't even notice after being shredded.

Your trusty box grater comes out here. Get all the potatoes into wee bits, and then shred away. Lay the resulting pieces out on paper towels to drain excess liquid, and slice the onions very thin. If you have a V-slicer or mandolin with a matchstick setting, you're golden. If not, you'll need to slice them by hand. Thinking of shredding them like the potatoes? Think again. I tried, and they fell apart. Ogres are like onions. They have LAYERS. (bonus points on the test for identifying the movie reference here) DO NOT use one of these devices:

Why? They make rings rather than shreds. At least that's what mine did, but mine is older than dirt.
When your vegetation is suitably dried, mix in the flour, salt, and then eggs. At this point, you should have a 10" skillet on the stove, medium/high heat, obviously with the oil inside. There are a few basic methods for determining the temperature of oil:
The average popcorn kernel pops at about 350 degrees. Enough said.
When placed in properly heated oil, a little piece of bread will sizzle and bubble noticeably. For the love of pete, DO NOT put a whole slice of bread in the pan! Just don't do it!
A good ol' fry thermometer (350 degrees)
OR a fancy new infrared thermometer. Those are cool. I don't own one.
Squish 1/4 cup portions into 1/2 inch thick patties, and place about 3 in the oil at a time. Cook 2-3 min. on each side. They're done once they turn golden brown and delicious.

Contrary to classical belief, more oil does not equal greasy food. In fact, the contrary is true. More oil (at a suitable temperature) will cook the food more quickly, allowing less absorption of the fat. Take that, weight watchers! You can also filter oil that has not been heated beyond 450 degrees through cheesecloth and use again. If you notice significant color change or ever, ever see smoke, it's time for a change.
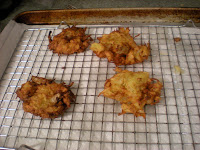
When the pancakes are done, place on a draining rig composed of a cookie sheet with paper towels inside, and an inverted cake cooling rack on top of that. Looks something like this:

4 russet potatoes
1 small onion
1 large egg, beaten
2 1/2 tablespoons flour
1 teaspoon salt
2 cups of oil (canola, peanut, vegetable, whatever for frying)
Assemble your vegetation and cut into spreadable pieces. Peeling the potato is optional; most people don't even notice after being shredded.

Your trusty box grater comes out here. Get all the potatoes into wee bits, and then shred away. Lay the resulting pieces out on paper towels to drain excess liquid, and slice the onions very thin. If you have a V-slicer or mandolin with a matchstick setting, you're golden. If not, you'll need to slice them by hand. Thinking of shredding them like the potatoes? Think again. I tried, and they fell apart. Ogres are like onions. They have LAYERS. (bonus points on the test for identifying the movie reference here) DO NOT use one of these devices:

Why? They make rings rather than shreds. At least that's what mine did, but mine is older than dirt.
When your vegetation is suitably dried, mix in the flour, salt, and then eggs. At this point, you should have a 10" skillet on the stove, medium/high heat, obviously with the oil inside. There are a few basic methods for determining the temperature of oil:
The average popcorn kernel pops at about 350 degrees. Enough said.
When placed in properly heated oil, a little piece of bread will sizzle and bubble noticeably. For the love of pete, DO NOT put a whole slice of bread in the pan! Just don't do it!
A good ol' fry thermometer (350 degrees)
OR a fancy new infrared thermometer. Those are cool. I don't own one.
Squish 1/4 cup portions into 1/2 inch thick patties, and place about 3 in the oil at a time. Cook 2-3 min. on each side. They're done once they turn golden brown and delicious.

Contrary to classical belief, more oil does not equal greasy food. In fact, the contrary is true. More oil (at a suitable temperature) will cook the food more quickly, allowing less absorption of the fat. Take that, weight watchers! You can also filter oil that has not been heated beyond 450 degrees through cheesecloth and use again. If you notice significant color change or ever, ever see smoke, it's time for a change.
When the pancakes are done, place on a draining rig composed of a cookie sheet with paper towels inside, and an inverted cake cooling rack on top of that. Looks something like this:

Drain, repeat, and eat! (With applesauce, of course)

This was my FIRST time ever slicing an onion. :)
Subscribe to:
Posts (Atom)